Create a Web API
This tutorial teaches the basics of building a Web API with ASP.NET Core in SnapDevelop.
In this tutorial, you learn how to:
- Create a Web API Project
- Test the API
- Add a Database Context
- Register the Database Context
- Add a Service
- Call the Service API from PowerBuilder
Prerequisites
SnapDevelop 2019
Sample database setup
- Download the database backup file from https://github.com/Microsoft/sql-server-samples/releases/download/adventureworks/AdventureWorks2012.bak. (This specific version of the DB is required for this tutorial)
- Install SQL Server Express or SQL Server if it is not installed.
- Restore database using the downloaded database backup file.
Create a Web API Project
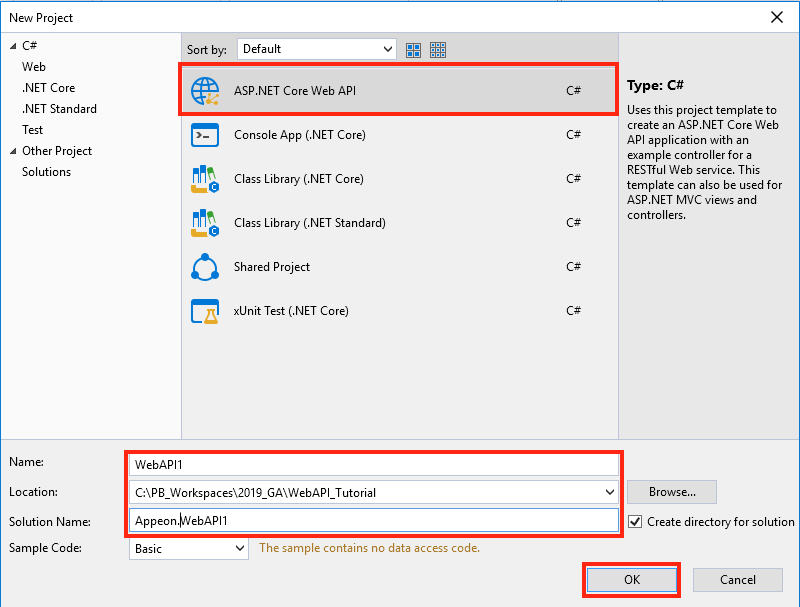
Start SnapDevelop and select Create New Project from the Start page. Or, from the File menu, select New and then Project....
In the New Project dialog box, select .NET Core, and in the list of project templates, select ASP.NET Core Web API. Name the project "WebAPI1", name the solution "Appeon.WebAPI1" and click OK.
Test the API
The project template creates a sample API. Call the Load method from a browser to test the application.
Press Ctrl+F5 to run the application. SnapDevelop launches a browser and navigates to http://localhost:5000/api/sample/load.
If it's the first time the Web API runs, you may need to wait several seconds for initiating .NET runtime after the browser is launched.
The following JSON is returned:
["value1","value2"]
Add a Database Context
The database context is the class that manages database connections and transactions. This class is created by deriving from the SnapObjects.Data.DataContext class.
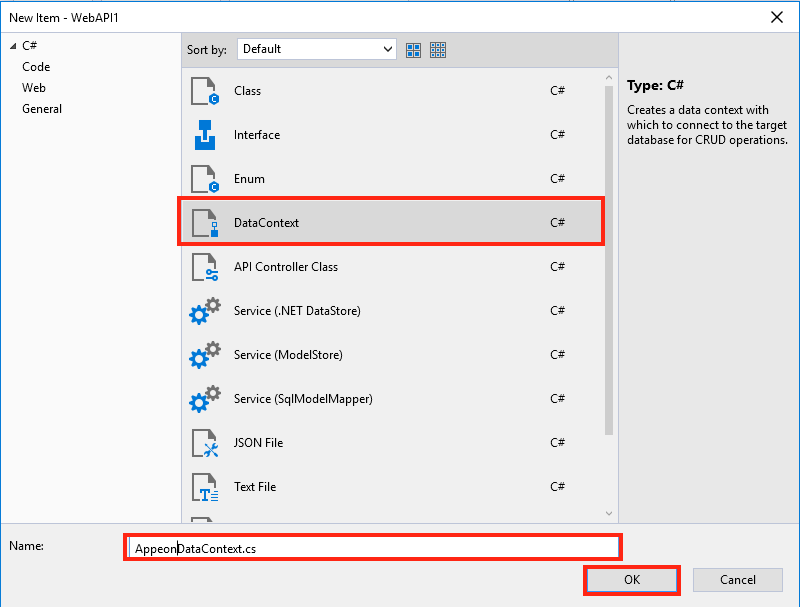
Right-click the WebAPI1 project and select Add > New Item.... In the item template list select DataContext and name the class AppeonDataContext and click OK.
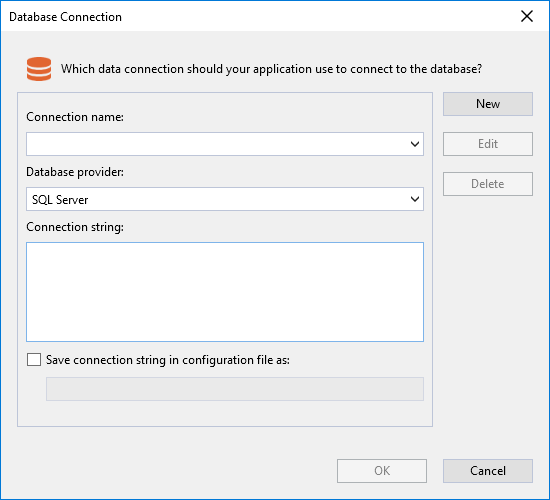
In the Database Connnection dialog box, click New.
In the connection properties dialog box, fill in database connection information and click OK.
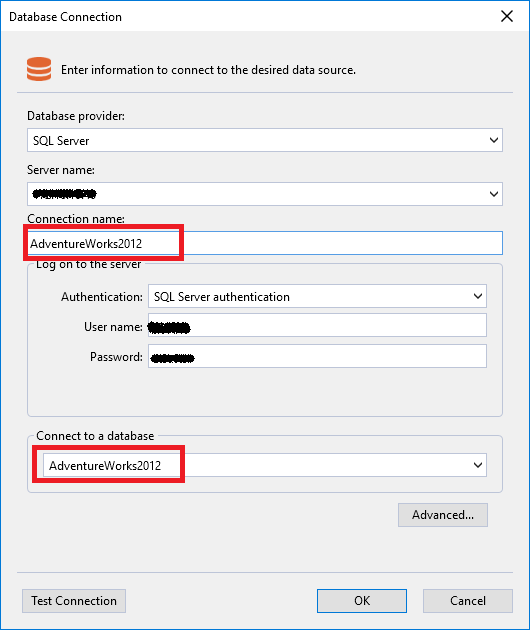
Then back to the Database Connection dialog box, Connection String is generated by the connection properties dialog box, click OK.
The Connection String is saved in appsettings.json and the AppeonDataContext class is created.
Register the Database Context
In ASP.NET Core, services such as the DataContext must be registered with the dependency injection (DI) container. The container provides the service to controllers.
Update Startup.cs according to the comments:
// Add the following using statements
using SnapObjects.Data;
using SnapObjects.Data.SqlServer;
and modify the ConfigureServices() method in Startup.cs according to the comments:
// Uncomment the following line to connect to the SQL server database.
// Note: Replace "DataContext" with the configured context name; replace "key" with the database connection name that exists in appsettings.json. The sample code is as follows:
services.AddDataContext<AppeonDataContext>(m => m.UseSqlServer(Configuration["ConnectionStrings:AdventureWorks2012"]));
Add a Service
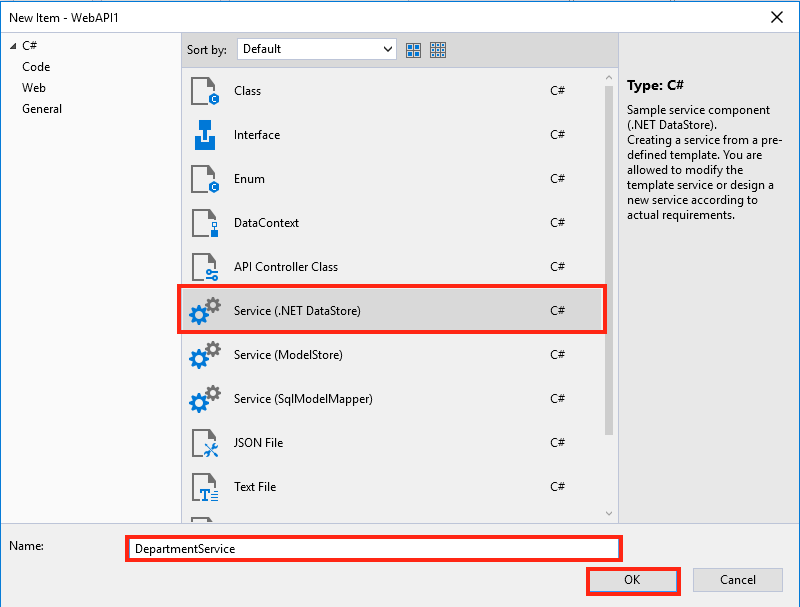
Right-click the WebAPI1 project and select Add > New Item.... In the item template list select Service (.NET DataStore) and name the service DepartmentService and click OK.
Choose the data context class (Created in Add a database context) that will be used to connect to the database. And change the name of the Controller to DepartmentsController. (It is a good practice to use plural names for your Controllers if any method will return/update/delete more than one row).
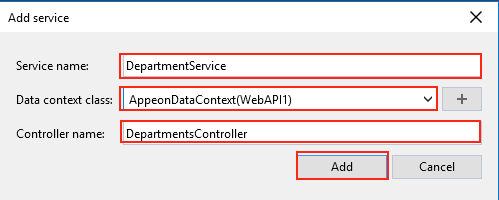
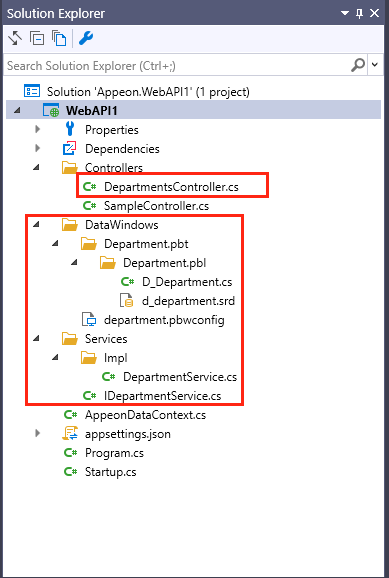
Click Add. The following classes and folders, marked in red, will be created. Keep in mind that the folders will only be created once:
Update Startup.cs, add the following using statement:
using WebAPI1.Services;
Update Startup.cs according to the comments:
// The service needs to be registered in the ConfigureServices method of the Startup class. Sample code as follows:
services.AddScoped<IDepartmentService, DepartmentService>();
Save the changes and press Ctrl+F5 to run the app. SnapDevelop launches a browser and navigates to http://localhost:5000/api/sample/load. Change the URL to http://localhost:5000/api/Departments/RetrieveOne/1 and click Refresh on the browser.
The following JSON is returned:
{"departmentId":1,"name":"Engineering","groupName":"Research and Development","modifiedDate":"2008-04-30T00:00:00"}
Call the Service API from PowerBuilder
Add the JSON DataWindow
A JSON DataWindow is a traditional DataWindow that has a Web API as its Data Source. You use the same functionalities on the client-side, but the data manipulation is done on the Web API server-side.
Start PowerBuilder and create a template application with no database connection. Then add a new Grid DataWindow, using the DataWindow Designer, that maps to the table: HumanResources.Department. Add a retrieval argument named departmentId that will be used in the SQL WHERE clause to filter by DepartmentID. Save the DataWindow object with the name d_department.
Put a DataWindow control on a sheet window. Set the DataObject to “d_department”. And add a button for the retrieve operation.
Retrieve the JSON DataWindow
The RESTClient object provides the ability to access the RESTful Web APIs. It can load the JSON-formatted string returned from the RESTful Web Service APIs into the DataWindow object.
To retrieve a JSON DataWindow, you first need to instantiate the RESTClient object. Add an instance variable of the RESTClient object in your window.
RESTClient inv_RestClient
On the Open event of your window, create the object variable.
// Create the RESTClient object variable
inv_RestClient	= CREATE RESTClient
On the Clicked event of your Retrieve button, add the RESTClient.RetrieveOne() function to call your Web API and load the data directly into your DataWindow. (If you intend to Retrieve more than one row, use RESTClient.Retrieve() instead)
// Retrieve the DW using the RESTClient
inv_RestClient.RetrieveOne(dw_department, "http://localhost:5000/api/departments/retrieveone/1")
Run your application. Press Ctrl+R. Click on the Retrieve button. (Note: Your Web API needs to be running.)